How to Build a Compliance Management System in 6 Step
Businesses today face a hugely complex, varied regulatory environment. Between national, international, local, and internal policies, managing compliance can be a massive undertaking.
Adopting an appropriate compliance management system is critical. Specifically, we need a singular, centralized solution for handling key data related to our compliance efforts.
The trouble is every business faces unique compliance challenges. We’re all constrained by different internal policies, with distinct processes that must adhere to them.
Today, we’re exploring one solution, by checking out how Budibase can be used to build a custom compliance management tool.
By the end, you’ll have a fully working tool that can be adapted to meet your exacting requirements.
Let’s start with the basics.
What is a compliance management system?
A compliance management system is an internal tool that’s used to store information relating to applicable polices, as well as managing any workflows required to maintain adherence with these.
For example, handling issues detection, auditing, policy discovery, or other relevant processes.
However, the scope of this can vary quite widely. So, some solutions might provide organization-wide compliance management, while others are focused on a specific department or business vertical.
Many tools are focused on even more granular use cases - such as managing security or privacy regulations within IT departments.
Often, these kinds of platforms can provide more advanced capabilities that support their core use case. So, in a security-focused context, we might see automated endpoint monitoring or other threat detection tools.
Take a look at our round-up of IT risk management tools to learn more.
In any case, the core pain point that compliance tools solve is providing a robust, centralized view of the policies that we’re bound to, along with streamlining the workload required to ensure we adhere to these.
So…
What are we building?
We’re building a simple, web-based compliance system, based around a two-role workflow.
This will enable:
Compliance Managersto manage policy data, request audits, and implement follow-on actions.Auditorsto view policies, carry out assigned audits, and recommend follow-on actions.
We’re building this by connecting to an external Postgres database and using Budibase to build interfaces, create user roles, and handle access control within our workflow.
We’re taking a lightweight approach to our data model in order to give you the flexibility to modify any of our data objects to suit the schema you need for your own workflows.
We’ll provide all of the queries you need to create our database and build along with this tutorial a little bit later.
Budibase also gives you the power to choose how and where you deploy your internal tools. We offer a cloud platform, as well as optional self-hosting on your own infrastructure.
How to build a compliance management system in 6 steps
Let’s get building. If you haven’t already, sign up for a Budibase account to create as many applications as you want for free.
1. Setting up our data model
The first thing we need to do is create a new Budibase application. We have a few options for doing this, including importing an existing app dump or using one of our pre-built templates. But today, we’re starting from scratch.
When we choose this option, we’re prompted to give our app a name. This is also used to generate a URL extension.
We’ll call ours Compliance Management System.

Connecting to our database
Once we’ve created our app, we need to set up a database.
We’re presented with a number of options, including connecting to an RDBMS, NoSQL tool, or spreadsheet. Or, we could start from scratch using BudibaseDB.

As we mentioned earlier, today, we’re using an existing Postgres table. When we choose that option, we’ll be asked to input our configuration credentials.

We’ll then be asked which of our database tables we’d like to fetch, making them queryable within our app. Our database has three tables called action, audit, and policy. We’re fetching all three.

If you want to create these tables in your own Postgres database, you can use the following query.
 1-- Create the Policy table with auto-incrementing ID
 2
 3CREATE TABLE Policy (
 4
 5  id SERIAL PRIMARY KEY, -- Auto-incrementing integer ID
 6
 7  name TEXT NOT NULL,
 8
 9  description TEXT,
10
11  effective_date DATE NOT NULL
12
13);
14
15-- Insert sample data into Policy table
16
17INSERT INTO Policy (name, description, effective_date)
18
19VALUES
20
21  ('Data Protection Policy', 'Ensures compliance with GDPR', '2023-01-01'),
22
23  ('Security Policy', 'Guidelines for access control and encryption', '2023-02-15'),
24
25  ('Incident Response Policy', 'Procedures for handling security incidents', '2023-03-10');
26
27-- Create the Audit table with auto-incrementing ID and foreign key to Policy
28
29CREATE TABLE Audit (
30
31  id SERIAL PRIMARY KEY, -- Auto-incrementing integer ID
32
33  policy_id INTEGER REFERENCES Policy(id) ON DELETE CASCADE, -- Foreign key to Policy.id (integer)
34
35  date DATE NOT NULL,
36
37  status TEXT CHECK (status IN ('Planned', 'In Progress', 'Completed')) NOT NULL,
38
39  findings TEXT
40
41);
42
43-- Insert sample data into Audit table
44
45INSERT INTO Audit (policy_id, date, status, findings)
46
47VALUES
48
49  ((SELECT id FROM Policy WHERE name = 'Data Protection Policy'), '2024-01-10', 'Completed', 'Minor issues found in data retention.'),
50
51  ((SELECT id FROM Policy WHERE name = 'Security Policy'), '2024-02-05', 'In Progress', 'Encryption policies not fully implemented.'),
52
53  ((SELECT id FROM Policy WHERE name = 'Incident Response Policy'), '2024-03-01', 'Planned', NULL);
54
55-- Create the Action table with auto-incrementing ID and foreign key to Audit
56
57CREATE TABLE Action (
58
59  id SERIAL PRIMARY KEY, -- Auto-incrementing integer ID
60
61  audit_id INTEGER REFERENCES Audit(id) ON DELETE CASCADE, -- Foreign key to Audit.id (integer)
62
63  description TEXT NOT NULL,
64
65  due_date DATE NOT NULL,
66
67  status TEXT CHECK (status IN ('Pending', 'In Progress', 'Resolved')) NOT NULL
68
69);
70
71-- Insert sample data into Action table
72
73INSERT INTO Action (audit_id, description, due_date, status)
74
75VALUES
76
77  ((SELECT id FROM Audit WHERE findings LIKE '%data retention%'), 'Revise data retention policy', '2024-02-15', 'In Progress'),
78
79  ((SELECT id FROM Audit WHERE findings LIKE '%Encryption%'), 'Implement full-disk encryption', '2024-03-10', 'Pending');
Here’s how these will look within Budibase’s Data section.

We’re going to use the Data section’s grid-like interface to make a few tweaks to this so that when we start generating UIs, they’ll better reflect our needs.
Firstly, all of our textual attributes are stored with the same TEXT data type, as Postgres doesn’t distinguish different types of strings based on their length.
However, there are some columns where we’re going to want to give end-users a little more space in form fields. These are the description columns in the action and policy tables and the findings column in the audit table.
Under each of these, we’ll hit Edit Column and change the type to Long Form Text.

Make sure to repeat this process for all three columns.
Secondly, both our audit and action tables have status attributes with the TEXT type. So, we’ll follow the same process as before, this time setting their type to Single Select. This time though, we’ll need to hit Add option to populate our possible values.
For the audit status, our options will be:
PlannedIn ProgressCompleted
We’re also setting our default value to Planned so that this will automatically be populated when a Compliance Manager schedules an audit.

We’ll repeat this process on the action table, setting our options to:
PendingIn ProgressResolved
Our default value this time will be Pending.

Setting up relationships between tables
Next, we need to define the relationships between our three tables. The queries we used to create these already provided primary and foreign keys to handle these.
Specifically:
- The
audit_idattribute in theactiontable corresponds toidin theaudittable. - The
policy_idattribute in theaudittable corresponds to theidattribute in thepolicytable.
We just need to set these up in Budibase. We’ll start by hitting define relationship on the action table.

Then, we’ll link many rows in the action table to one row in the audit table, using audit_id as our primary key and id as our foreign key.

We’ll then repeat this same process to link the audit table to the policy table.

We’ll now be able to call and interact with related rows when we’re using our table data.
Relationships with the users table
We also need to link each of our external tables to Budibase’s internal Users table. For this, we have two special data types called Single User and Multi User. We’re going to add several Single User columns across our three tables.
Firstly, we’re going to add a column called createdBy to each table. We’re also enabling the option do default to current user. This will populate a value that corresponds to the user that creates each new row.

Again, make sure you complete this process for all three tables.
On the audit table, we’re going to add a second Single User column and call it assignedTo. This time, we’re not using a default value, as we want Compliance Managers to assign Auditors manually.

We’re also going to assign ourselves to a couple of rows here for testing purposes in the following section on RBAC.

Configuring extra columns
Before we get to that, we’re going to add one additional attribute within our data model. On the audit table, add a column and call it title, this time selecting the Formula type. We can then hit the lightning bolt icon to create our formula.
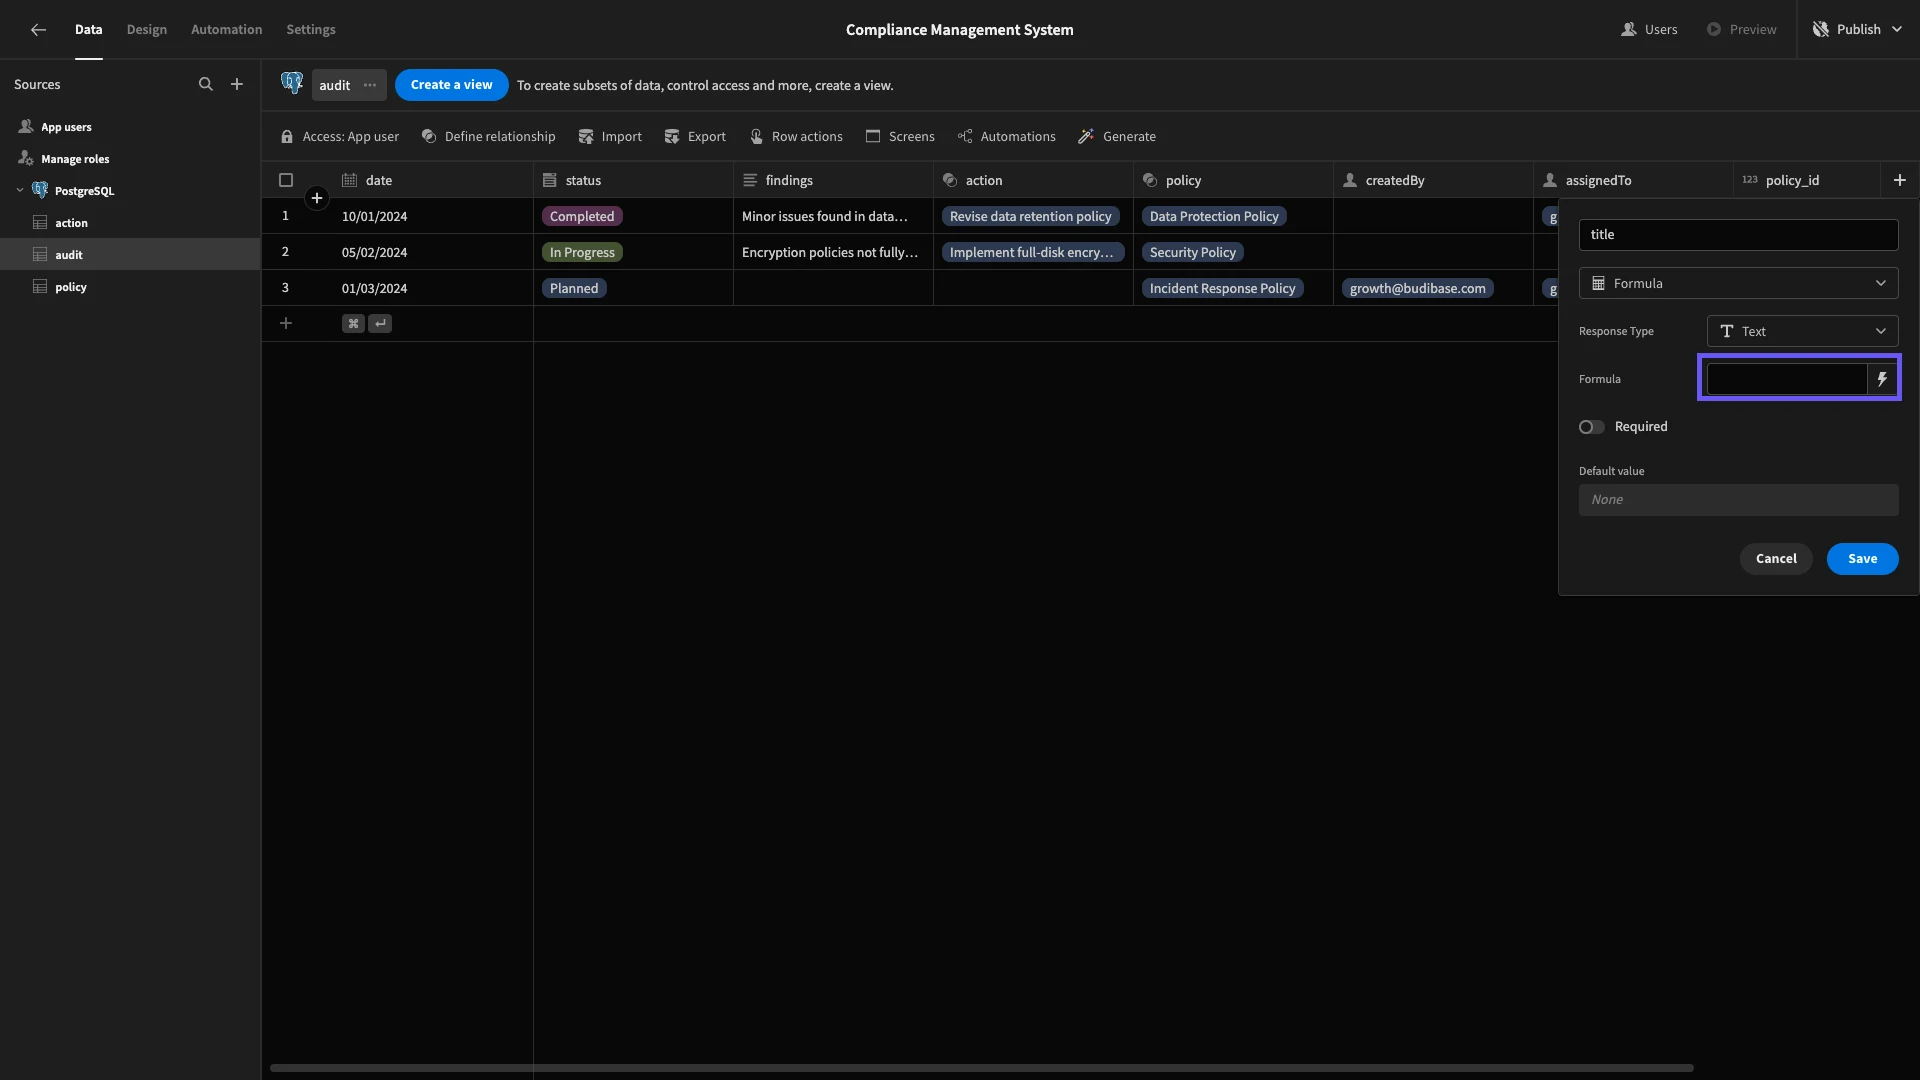
This will open a modal screen where we can enter either a handlebars or JavaScript expression. We’re using the following handlebars to print the name of the policy the audit relates to, as well as its due date.
1{{ policy.0.name }} Audit {{ date }}
We’ll then save our formula and designate title as our Display Column for this table.

Note that in the screenshot above, this option is disabled because we’ve already set it as our display column.
2. User roles and data access
Now that we have our database set up how we need it, we can start creating access rules for our compliance management system.
Creating custom user roles
First, we need to create our user roles. As we said earlier, these will be called Compliance Manager and Auditor. Eventually, we’ll give Compliance Managers full CRUD access for all of our tables, while Auditors will only be able to take more specific actions.
Within the Data section, hit Manage Role to open our visual RBAC editor.

We’ll start by hitting Add Role to create Compliance Manager.

We’ll then repeat this process to create Auditor.

We can reposition these to establish inheritance between roles. So, we’ll drag Auditor to the left of Compliance Manager and then draw a line between them. This means that Compliance Managers will inherent all permissions that we give to Auditors, as well as their own ones.

Configuring access to database tables
With our roles created, we can start granting permissions to each of them. As we said earlier, we want to give our Compliance Managers full read and write access across all data.
So, on each of our three tables, we’ll hit Access and choose Compliance Manager.

Repeat this process for all three tables.
For our Auditors, we need to set more granular access, as they’ll only be able to read and write specific columns and rows across our tables. We’re going to achieve this with custom Views.
First of all, head to the policy table and hit Create a View.

We’ll choose the Table option and call our view Auditor Policy.

Our Auditors will have full read access for all rows. Under Columns, we’ll set description, audit, and createdBy to read-only, as well as hiding id. We have to leave name and effective_date as writable, as they’re required fields, but we’ll disable these in our UI later.

Then, we’ll set the access to Auditor.

Next, we’ll create an Auditor Audit view and again set its access to Auditor. This time, we only want users to be able to access the rows that are assigned to them. So, we’ll hit Filter.

We’ll add a rule for the assignedTo attribute and then use the lightening bolt to open the bindings drawer.

And under Current User we’ll select the _id binding.

Now, we can only see the subset of rows that we assigned ourselves to earlier.

And we’ll configure our columns just like we did earlier.
This time, we’ll make policy_id and policy read-only and hide id, action, createdBy, and assignedTo. This leaves only findings, date, title, and status writable.

Lastly, we’ll create Auditor Action, again remembering to set our access to Auditor.
This time, we’ll add a filter based on Audit.assignedTo. This is the assignedTo attribute from the related row in the audit table. So, they’ll only be able to access and create actions against the audits that are relevant to them.
We’re binding this to {{ Current User.globalId }}.

We’ll hide audit_id and make created_by and status read only, since these have default values already that we don’t want Auditors to overwrite.

3. Build a CRUD UI for policies
Now that we’ve configured our data model and our access roles, the rest is easy. In Budibase, we can autogenerate user interfaces.
These will inherit the permissions that we’ve applied to the underlying tables and views we generate them from.
Start by heading back the policy table in the Data section. Here, we’ll hit Generate and select Table under App Screens.

When we do this, we’re given a few options for how we’d like to present the edit and create row forms on our new screen. We’re choosing the Modal option.

Here’s how this will look in the Design section. Note that our screen already has its access role set to Compliance Manager, the same as the underlying table we generated it from.

We’re going to make a few minor adjustments to this. First of all, we’ll select the Table component and use the sliders on the right to hide the id and createdBy attributes.

We also want to remove unnecessary fields from our two Form Block components. So, we’ll select create row form block, this time hiding the id and audit attributes.

We can also make adjustments to our forms to make better use of the vertical space. We’ll open the settings for our name and effective_date fields, and arrange them into two columns under Layout.

Under Styles, we’ll set our Button Position to Top.

We’ll also update the form’s Title to something a little more descriptive.

We’ll then repeat this exact same process for our other Form Block.

In terms of core CRUD functionality, our policies screen is ready to go.
However, we also want to give Compliance Managers the ability to schedule an audit of any policy, including setting a date and assigning an Auditor.
We’ll start by adding a blank Modal component, which we’ve named Audit Modal.

Inside this, we’ll add a Form Block, setting its Data to audit.

We only need Compliance Managers to add a small subset of fields when they create an audit row. So, we’ll deselect everything except policy, assignedTo, and date.

We’ll arrange assignedTo and date into columns, then change our button position and update our title once more.

We don’t want users to have to populate the policy field manually. Rather, we’re going to set this up so that it’s already filled in to reflect the row they clicked to open our modal.
To achieve this, we’ll head back to our Table component and add a button. We’ve set the Text for this to Schedule Audit.

We then need to configure what this button will do. Under its settings we’ll open the actions drawer, first adding a step called Update State.

This will store a key/value pair in the background of our app.
We’re setting our Key to policyToAudit, to make it obvious what this does. We’ll bind our Value to {{ policy - Table.policy._id }}. This is the unique identifier of the row the user has clicked.

Then, we’ll add a second step called Open Modal and point this at our Audit Modal.

Back to our audit form, we’ll select the policy column and give it a default value of {{ State.policyToAudit }}, and then select the Disabled option.

Now, a policy value is auto-populated and displayed, but users can’t overwrite this.
And that’s our policies UI ready to go.
4. Adding a UI for auditors
Once an audit has been scheduled, the next step in our workflow is for this to be picked up by the assigned auditor. They can then alter its status, add findings, or create related action rows.
We’ll start by generating a Table screen with modal forms based on our Auditor Audit view.

We’ll be making more extensive changes to this screen compared to the last one. For a start, auditors don’t need to add rows, so we’ll delete this Modal and the corresponding button.

Unlike our previous screen, we want to display certain values from the related policy role. To do this, we’ll head back to the data section and select our Auditor Audits view.
Under the related policy column, we’ll add effective_date, name, and description as readable attributes.

Back in the Design section, we’ll add policy.name and policy.description to our table. We’ll deselect policy_id, policy, findings and policy.effective_date.

Because of the underlying data, this table is already filtered to only include rows that are assigned to the current user.
However, when a Compliance Manager navigates to this screen, we’d like to display all rows.
We can achieve this using Budibase’s conditionality feature. Select the Table component and hit Conditions, where we can open the conditionality drawer.

We can use this editor to display, hide, or update any native setting of our component based on any data it’s exposed to.
We’re going to create an Update Setting rule, that will set our Data setting to the unfiltered audit table.

This will be applied if {{ Current User.roleId }} equals {{ Role.Compliance Manager }}.

Next, we’ll start updating our edit row form to better suit our workflows. Specifically, we want users to be able to do the following in addition to the existing actions on the relevant audit row.
- View the policy that the requested audit applies to.
- Register related actions.
- View existing related actions.
On the existing form, we’ll start by deslecting the policy and policy_id attributes. We’ll also set date to disabled, and set it and status to be arranged in columns. We’ve also removed the delete button and bound the Title to {{ Edit row form block.Auditor Audit.title }}.

Now, our users can only update the status and findings fields to complete an audit.
From this modal, we also want to give users the option to read the relevant policy. We’ll start by placing a Side Panel component below our existing Modal.

Inside this, we’ll place a Form Block with it’s Data set to Auditor Policy and it’s Type set to View. We’ll deselect all fields except effective_date and description, and bing our Title to {{ Policy Form Block.policy.name }}.

We need to configure this so that it loads the appropriate policy row for the audit row that a user is viewing, using the Row ID setting.
We’ll bind this to the policy._id output of our audit for block, using {{ Edit row form block.Auditor Audit.policy.0._id }}.

We’ll also add a Button to our form and call it Close. This will trigger a Close Side Panel action.

Back on our audit form, we’ll add a corresponding button and set its Text to Policy. This triggers an Open Side Panel action, pointed at our new Policy Side Panel.

Next, we want to start building a UI for handling actions. We’ll start by adding a container beneath our audit form. We’re calling this Center Container, and setting it’s Horizontal Alignment to Center.

Within this, we’ll nest a second container called Width Container and set its Width to 600 to match our form.

Inside this, we’ll add a Table component, with its Data set to Auditor Actions. We’re also giving this a fixed Height of 200.

We’re deselecting all columns except due_data and status.

Next, we need to create a form UI for auditors to submit actions against the current audit row.
We’ll start the same way as we did before, by creating a Side Panel component with a Form Block nested inside it. This time the form’s Data is Auditor Actions and its Type is Create.

We’ll hide createdBy and status since these have default values, as well as setting audit to disabled and repositioning our button.

Then, we’ll give audit a default value of {{ Edit row form block.Auditor Audit._id }}.

Back in our Modal, we’ll add another Container about our Table. We’ll call this Headline Container and place a Headline component within it to read Actions.

Next to our Headline, we’ll add a button with the display text Add Action.

Lastly, we’ll set this to open our new side panel.

5. Audit outcomes and actions
Our last screen will be used by Compliance Managers to manage actions that have been recommended by auditors.
We’ll start by generating one last Table screen with Modal forms based on our actions table. This time, we’re leaving all columns enabled except id and audit_id.

Once again, we’re going to remove our Create button and corresponding modal/form.

This time, we’ll place an Options Picker component where our button used to be, with its Field set toAudit.
The idea here is to enable our Compliance Managers to filter recommended actions based on the audit row they’re associated with.
This means we need to populate the options that we offer to end-users dynamically in order to take account of new audits as they’re created, without needing a Budibase admin to add these.
To do this, we’ll start by adding a component called a Data Provider at the bottom of our screen. This accepts a data source, and exposes all of the other components on the screen to it via bindings.
This will be invisible to end-users.
We’ve pointed Data Provider at the audit table.

Back to our Options Picker, we’ll set the Options Source to the output of our new Data Provider. For the Label Column, we’re using the title attribute and for the Value Column, we’re using id.
In other words, end-users will select an audit by their title, but the Options Picker will output the unique identifier of the corresponding row.

Then, we’ll add a condition to our table that applies a filter if our Options Picker is not blank.

We’ll set our filter rule to return rows where audit_id equals {{ Audit Options Picker.Value }}.

Lastly, we’ll head back to our modal form, update our display text, reposition the button, and arrange our fields into columns.
We’ve also disabled all fields except status.

6. Design tweaks and publishing
From a functional perspective, our compliance management system is ready to go. However, before we push it live, we’re going to make a few UX tweaks.
First of all, we’ll head to Screen and Theme, where we’ll choose Midnight.

In the same panel, we can update our button colors to match the Budibase brand better.

Under Navigation, we can make any adjustments we’d like to the display text for our menu items.

Similarly, we can update the display text of all of our table columns and form fields to be more human-readable rather than simply using the names of our attributes as they’re stored in our underlying database.

Once we’re happy, we can hit Publish to push our new application live.

Here’s a reminder of what the finished product should look like.
Turn data into action with Budibase
Budibase is the fast, easy way to build secure applications for handling IT workflows. With extensive data support, autogenerated UIs, optional self-hosting, free SSO, and more, there’s never been an easier way to ship internal tools at pace.
Take a look at our features overview to learn more.